Selenium WebDriver is one of the most popular tools for Web UI Automation. And no better than Python can complement it to automate a broad range of web applications. Hence, we brought this Selenium Webdriver Python tutorial to ramp you up quickly on the task. So let’s start by understanding what all we have to do in UI automation testing.
Web UI Automation means the automatic execution of the actions performed in a web browser window like navigating to a website, filling forms that include dealing with text boxes, radio buttons and drop downs, submitting the forms, browsing through web pages, handling pop-ups and so on. Selenium WebDriver is the one that can automate all these tasks. It can interact with all types of Web browsers available till date like Firefox, Internet Explorer, Safari, and Chrome, etc.
Most of the time, we use Java and Eclipse to create a Selenium Webdriver project. In this post, we’ll use Python to replace Java and demonstrate how the Selenium Webdriver Python integration works to achieve the Web UI automation.
Selenium is an open source, and its library is available in different programming languages to perform the Web UI Automation testing, and Python is one of them.
Selenium WebDriver Client Library for Python enables us to utilize all the features available with Selenium WebDriver and interact with Selenium Standalone Server to perform Automated testing (both remote and distributed testing) of browser-based applications.
It could be relevant for you to know about the team and its members who drove the development of the Selenium WebDriver Python libraries, they are Miki Tebeka, Adam Goucher, Eric Allenin, David Burns, Luke Semerau, Jason Huggins and MaikRoder.
The Selenium Webdriver library is compatible with a series of Python versions that includes Python 2.6, 2.7, and 3.2-3.5.
In this post, we’ll mainly discuss the following subjects so that you get acquainted with Selenium Webdriver Library for Python:
Table of Content
Let’s now learn every little detail about setting up the Selenium Webdriver Python environment and write our first Selenium test script in Python.
Selenium Webdriver Python Setup for Web Automation
Installing Python
On Linux Distributions, MAC OS X, and Unix machines; Python is by default installed.
However, on Windows machines, it needs to be installed separately. Python installers for different Operating Systems are available at the following link:
➡ Download Python Installer
For this tutorial, we’ve downloaded the latest version of Python (3.5.1) and used it for the examples given in the different sections of this tutorial. You can use the direct link given below to install the Python 3.5.1.
➡ Download Python (3.5.1)
After you run the Python installer, it also installs the <pip> tool which is Python’s package manager. It facilitates the installation of advanced packages like the Selenium Webdriver.
Installing Selenium Webdriver Python Package
There are two unique ways to set up Selenium Webdriver with Python.
A- Use PIP package manager to install Selenium with Python
1- First go to the directory where you’ve installed Python.
For example, we have the latest Python version 3.5.1, and its location is in the <C:\python\python35> folder.
2- Use the <pip> tool to install the Selenium Webdriver package.
C:\python\python35>pip install selenium
Collecting selenium
  Downloading selenium-2.53.0.tar.gz (815kB)
←[K    100% |################################| 819kB 108kB/s ta 0:00:01
Installing collected packages: selenium
  Running setup.py install for selenium
Successfully installed selenium-2.53.0
←[33mYou are using pip version 7.1.2, however, version 8.1.0 is available.
You should consider upgrading via the 'python -m pip install --upgrade pip' command.
If you want to upgrade the currently installed Selenium Webdriver package then, just add the -U flag to the previous <pip> command. Since we already have the latest version of the Selenium Webdriver library, the upgrade command will return the status as up-to-date.
C:\python\python35>pip install -U selenium
Requirement already up-to-date: selenium in c:\python\python35\lib\site-packages
←[33mYou are using pip version 7.1.2, however, version 8.1.0 is available.
You should consider upgrading via the 'python -m pip install --upgrade pip' command.
This approach is the safest of all the methods available for installing Selenium with Python. The above commands will set up the Selenium WebDriver library on the system that contains all modules and classes required to create automated test scripts using Python.
The <pip> tool will download the latest version of the Selenium package and install it on your machine.
The optional –U flag will upgrade the existing version of the installed package to the latest version.

Selenium Webdriver Python Package Installation
B- Build Selenium Jar from Source and install with Python
1- Download the Selenium source code bundle from the below link. Extract the source into the folder <selenium-2.53.1> and follow the next step.
➡ Download Selenium-2.53.1.tar.gz
2- Now start the command prompt using cmd.exe and run the following command to install Selenium with Python:
C:\python\python35>cd selenium-2.53.1
C:\python\python35\selenium-2.53.1>python setup.py install
TOC
Selecting Python Editor (IDE)
After we have set up Python and Selenium WebDriver, the next important step is to either pick an editor or an IDE (Integrated Development Environment) for writing the test scripts. A good editor or an IDE makes coding simple with their features. An IDE is even more powerful and comes with some excellent features like:
- A graphical code editor with Code Completion feature.
- Syntax highlighting.
- Code explorer for functions and classes.
- Managing Project structure.
- Reporting and logging tool.
- Tools for Debugging and Unit Testing.
Text editors like Vim, Nano or Notepad, are available to write the Python test scripts.
But IDEs are more convenient to work on large projects, so here we are giving a brief overview of some of the famous ones:
Popular Python IDEs for Development
a) PyCharm: It supports Windows, Linux, and Mac operating systems. PyCharm comes in two versions- community edition and professional edition. You can readily use its Community Edition as it is free. It has a Professional version which has more advanced features, but you’ve to purchase it.
Hence, the Community edition is suitable for creating and running Selenium test scripts. It has excellent debugging capabilities. To explore more about PyCharm and its features reach out the following link:
http://www.jetbrains.com/pycharm/
b) PyDev Eclipse plugin: PyDev is Python IDE for Eclipse.PyDev can be installed as a plug-in via the Eclipse update manager using the following update site: http://pydev.org/updates
You can see the detailed installation instructions at:
http://www.vogella.com/tutorials/Python/article.html
c) PyScripter: PyScripter is free and open-source Python IDE for Windows. It isn’t compatible with Linux. It provides an extensive blend of features that modern IDEs offer such as IntelliSense and code completion, testing, and debugging support. More details about PyScripter and its download information is available at the following link:
https://code.google.com/p/pyscripter/
With this, we are ready to create and run our test scripts using Selenium and Python.
TOC
Prepare Your First Selenium Webdriver Automation Script Using Python
Let’s start with Selenium WebDriver and create a Python script that uses Selenium classes and functions to automate browser interaction.
Here we will show you a sample script that opens “www.google.com” enters a search text in the Google search text box. Test script then verifies the Google search page on which has the searched text displayed.
Selenium Webdriver Python Script for Firefox
from selenium import webdriver
from selenium.webdriver.common.keys import Keys

# create a new Firefox session
driver = webdriver.Firefox()
driver.implicitly_wait(30)
driver.maximize_window()

# Navigate to the application home page
driver.get("http://www.google.com")

# get the search textbox
search_field = driver.find_element_by_id("lst-ib")
search_field.clear()

# enter search keyword and submit
search_field.send_keys("Selenium WebDriver Interview questions")
search_field.submit()

# get the list of elements which are displayed after the search
# currently on result page using find_elements_by_class_name method
lists= driver.find_elements_by_class_name("_Rm")

# get the number of elements found
print ("Found " + str(len(lists)) + " searches:")

# iterate through each element and print the text that is
# name of the search

i=0
for listitem in lists:
   print (listitem.get_attribute("innerHTML"))
   i=i+1
   if(i>10):
      break

# close the browser window
driver.quit()
Decoding the above script
Let’s discuss the script line by line to get a better understanding of the Selenium WebDriver statements in brief. There will be lot more about different Selenium WebDriver functions in upcoming posts.
Step-1.
The selenium webdriver module implements the classes that support different browsers including Firefox, Chrome, Internet Explorer, Safari, others and RemoteWebDriver too to test on browsers available on remote machines.
We need to import webdriver from the Selenium package to use the Selenium WebDriver methods as:
from selenium import webdriver
Step-2.
Next, we need the object of the browser which we’ll use to load the web page. The browser object provides a programmable interface to communicate with the browser using the Selenium commands. In the test script, we are using Firefox. We can create an instance of the Firefox as shown in the following code:
driver = webdriver.Firefox()
On executing this statement, a new Firefox window will launch. We had made the following settings for the driver instance:
driver.implicitly_wait(30)
driver.maximize_window()
We configured a timeout for Selenium to launch the browser in 30 seconds. Next statement maximizes the browser window.
Step-3.
Next, we will navigate to the application, in our case ‘
http://www.google.com,’ passing the given URL to the driver.get() method. After making a call to the get() method, Webdriver waits until the page gets rendered in the browser window and sends the control back to the script.
After the page gets loaded, Selenium will interact with various elements on the page. Next, in the test script, we will be looking at different Selenium WebDriver functions that search an HTML object, send a text to the web component, simulate keypress event, click buttons and select from drop downs, etc. Let’s see all these functions getting used in the next step.
Step-4.
* First of all, we’ll locate the Google Search textbox to supply the text input for the Search. The Search text box has an id attribute as <lst-ib>, and you can identify it from the code given below:
search_field = driver.find_element_by_id(<lst-ib>)
* After locating the Search text box, we are trying to interact with the textbox element by clearing the previous value using the clear() method and then using the send_keys() method to provide a new value. Subsequently calling the submit() method will forward the search request for processing. You can see a quick preview of these steps in the next few lines.
search_field.clear()
search_field.send_keys(“Selenium WebDriver Interview questions”)
search_field.submit()
* After submitting the search request, Firefox driver will display the result page returned by Google. The result page shows a list of entries that match the searched text. Each of the entry in the list is captured in anchor <a> element and can be accessed using “find_elements_by_class_name” method. If used, it will return a list of elements as:
lists= driver.find_elements_by_class_name(“_Rm”)
* The list of items expands to many pages, so we are restricting our code to print first ten entries captured in the anchor tag. We are outputting the names of the entries using the “innerHTML” property of the anchor <a> elements:
i=0
for listitem in lists:
   print (listitem.get_attribute("innerHTML"))
   i=i+1
   if(i>10):
      break
This example gave us a real insight into using Selenium WebDriver and Python together to create a simple test automation script. It is a very basic example script. We will use other interesting and complicated features of Selenium Library with Python in our upcoming posts.
TOC
Creating Selenium Webdriver Python Script for Internet Explorer and Google Chrome
Selenium supports cross-browser testing which means we can automate other browsers like Internet Explorer, Google Chrome, Safari and headless browsers like PhantomJS.
In this section, we will reuse the test script created in the earlier for the Internet Explorer and Google Chrome to verify the cross-browser capabilities of Selenium WebDriver.
Setting up Internet Explorer (IE)
To run the Selenium test scripts in the Internet Explorer, you first need to download and set up the
InternetExplorerDriver server. This driver is a standalone server executable which enforces the WebDriver’s wire protocol to work as a link between the test script and Internet Explorer browser.
It supports most of the IE versions on Windows XP, Vista, Windows 7 and Windows 8 operating systems.
Following are the steps to set up the
InternetExplorerDriver server:
i. Download the InternetExplorerDriver server from the mentioned link http://www.seleniumhq.org/download/. Both 32 and 64-bit versions are available for download. We have to choose based on our system configuration.
ii. Extract the downloaded InternetExplorerDriver server and copy the file to the same directory where the test scripts reside.
iii. Next, you need to check the Protected Mode setting (in IE 7 or higher). It must have the same value for each security zone. You can keep it on or off as long as it is the same for all the zones. Following are the steps to modify the Protected Mode settings in IE:
a. Choose Internet Options from the Tools menu.
b. From the Internet Options dialog, click on the Security tab.
c. Select each zone listed in “Select a zone to view or change security settings” and make sure that “Enable Protected Mode” (may require restarting your browser) is either on or off for all the zones. It is advisable for all the zones to have the similar settings as shown in the image as given below:
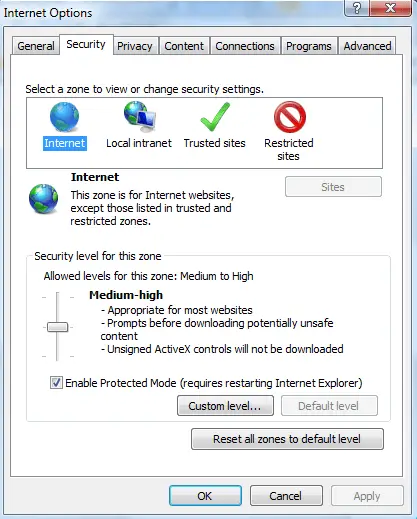
Selenium Webdriver Python IE Settings
iv. Finally, make the following modifications to the test script to open the website on Internet Explorer browser:
Selenium Webdriver Python Script for IE
import os
from selenium import webdriver
from selenium.webdriver.common.keys import Keys

# get the path of IEDriverServer
dir = os.path.dirname(__file__)
ie_driver_path = dir + "\IEDriverServer.exe"

# create a new Internet Explorer session
driver = webdriver.Ie(ie_driver_path)
driver.implicitly_wait(30)
driver.maximize_window()

# Navigate to the application home page
driver.get("http://www.google.com")

# get the search textbox
search_field = driver.find_element_by_name("q")

# enter search keyword and submit
search_field.send_keys("Selenium WebDriver Interview questions")
search_field.submit()

# get the list of elements which are displayed after the search
# currently on result page using find_elements_by_class_name method
lists= driver.find_elements_by_class_name("r")

# get the number of elements found
print ("Found " + str(len(lists)) + " searches:")

# iterate through each element and print the text that is
# name of the search

i=0
for listitem in lists:
   print (listitem.get_attribute("innerHTML"))
   i=i+1
   if(i>10):
      break

# close the browser window
driver.quit()
Execution steps in the test script created for Internet Explorer are pretty much similar to what we did for Firefox.
Here one important point to note is that locators may get changed on different browsers so always verify them before using in the test scripts created for Selenium Test Automation.
TOC
Setting up Google Chrome (Chrome)
The above Selenium test automation script can also run on Google Chrome without making too many modifications.
You need to download the
ChromeDriver server library similar to the
InternetExplorerDriver. The
ChromeDriver server is a standalone server, and it implements WebDriver’s wire protocol for automating Google Chrome.
This Selenium driver is compatible with Windows, Linux, and OS X operating systems. You can download the
ChromeDriver server using the below steps:
i. Get the latest library of the ChromeDriver from http://chromedriver.storage.googleapis.com/index.html.
ii. Extract the downloaded ChromeDriver and copy the file to the same directory where the test scripts reside.
iii. Finally, make the following modifications to the test script for opening the website in the Chrome browser:
Selenium Webdriver Python Script for Chrome
import os
from selenium import webdriver
from selenium.webdriver.common.keys import Keys

# get the path of ChromeDriverServer
dir = os.path.dirname(__file__)
chrome_driver_path = dir + "\chromedriver.exe"

# create a new Chrome session
driver = webdriver.Chrome(chrome_driver_path)
driver.implicitly_wait(30)
driver.maximize_window()

# Navigate to the application home page
driver.get("http://www.google.com")

# get the search textbox
search_field = driver.find_element_by_name("q")

# enter search keyword and submit
search_field.send_keys("Selenium WebDriver Interview questions")
search_field.submit()

# get the list of elements which are displayed after the search
# currently on result page using find_elements_by_class_name method
lists= driver.find_elements_by_class_name("r")

# get the number of elements found
print ("Found " + str(len(lists)) + " searches:")

# iterate through each element and print the text that is
# name of the search

i=0
for listitem in lists:
   print (listitem.get_attribute("innerHTML"))
   i=i+1
   if(i>10):
      break

# close the browser window
driver.quit()
Upon executing the above test script, Selenium will first launch the
Chromedriver server, which starts the Chrome browser and performs the steps. This execution is very similar to what you’ve seen with Firefox and the Internet Explorer above.